Free Roof Inspections in Denver, Photo-Documented and No-Pressure
A close-range, fully photographed roof inspection from a licensed, local Denver roofing contractor. If your roof needs nothing, we tell you. Most roof inspection Denver visits are scheduled within the same week.
Book your free inspection
Photo-documented and no-pressure: book in 60 seconds and we confirm a time, often the same week.
Free roof inspection Denver, in plain terms
Direct answer: Precision Exteriors Restoration offers free, no-pressure roof inspections across Denver and the Front Range, usually scheduled within the same week. A licensed Colorado contractor (License #0248041) documents your roof with photos, flags hail, wind, and age-related damage, and provides a written scope, useful whether you file an insurance claim or pay out of pocket. A typical inspection takes about 45 to 60 minutes.
This roof inspection Denver page is part of our roofing services. Start at the Denver roofing services hub or the Precision Exteriors home page , and when an inspection finds damage, move on to roof repair or roof replacement.
What a Professional Roof Inspection Actually Covers
Direct answer: A real inspection is a close-range examination of the whole roofing system, not a glance from the driveway. Here is what we evaluate and document on every visit.
Most roof damage in Denver is invisible from the ground. Hail fractures the fiberglass mat inside a shingle without immediately causing a leak. Wind lifts and reseats shingles in a way that looks normal from the street but has already broken the seal. A driveway inspection misses all of it. A proper inspection means a trained eye at close range on every roof plane, with photos of what is found.
Shingles and the mat beneath
We check for hail bruising, granule loss, mat fracture, cracking, curling, and blistering, plane by plane. In Denver, the damage that matters most is the bruising and mat fracture that shortens a roof's remaining life without producing an obvious leak.
Flashing and penetrations
Every point where two materials meet is a potential leak: pipe boots, chimney step flashing, valley metal, skylights, and wall transitions. Colorado's 150-plus annual freeze-thaw cycles stress these locations harder than most climates, so we inspect each one directly.
Ventilation and the attic side
Inadequate intake and exhaust ventilation shortens shingle life and drives ice-dam and moisture problems. Where access allows, we check ventilation balance and look for interior signs of past or active water intrusion.
Gutters, drip edge, and eaves
We check drainage, drip edge condition, and the eave detailing where ice and water shield protects against Denver's freeze-thaw. Excess granules in the gutters are an early signal of shingle wear.
Photo documentation of everything
You receive photos of what we find, good and bad, with a plain-language written assessment. You see your roof the way we see it, not just a verbal summary.
Storm and hail focus
Denver sits in Hail Alley. We look hardest for the functional hail damage and wind damage that ground-level checks miss entirely.
When You Should Get a Roof Inspection in Denver
Direct answer: Six moments when a close-range, documented inspection protects your home and your wallet: after a storm, before you buy or sell, once a year, when you spot the signs, when the roof is 15+ years old, and before a warranty ends.
After a hail or wind storm
Denver sits in Hail Alley. Get checked after any hail near 1 inch or a Chinook wind event, even when nothing looks wrong from the ground. Spot hail damage.
Before you buy or sell
Document the roof's true condition before closing, and avoid a surprise replacement decision after the sale.
Once a year
At 5,280 feet, higher UV ages roofs faster. An annual spring check catches problems while they are still small.
When you spot the signs
Granules in the gutters, a ceiling stain, daylight in the attic, or missing and curling shingles.
When the roof is 15+ years old
Standard shingles run about 18 to 22 years at altitude. Older roofs deserve a close look before they fail.
Before a warranty ends
Surface any covered issues while your manufacturer or workmanship warranty still applies.
What You Receive From Your Inspection
Direct answer: Accurate information about your roof, in writing, with no obligation to buy anything.
Everything included with your free inspection
- ✓
An annotated photo report Clear, labeled photos of every finding on each roof plane, so you see exactly what we see instead of a verbal summary.
- ✓
A written condition assessment A plain-language report on shingles, flashing, ventilation, and gutters, with the issues that actually matter clearly flagged.
- ✓
A roof health summary An honest read on your roof's overall condition and estimated remaining life, so you can plan ahead instead of guess.
- ✓
A clear recommendation Repair, replace, or nothing needed, with the reasoning explained. Roof repair or roof replacement.
- ✓
Insurance-ready documentation If we find storm damage, your photos and findings are documented in a format that supports a claim and an adjuster meeting.
- ✓
No-pressure next steps You decide what happens next. There is no obligation to buy anything and no high-pressure pitch, ever.
Your Inspection and an Insurance Claim
Most Denver roof replacements follow a hail or wind event and involve an insurance claim, and it starts with documentation. When our inspection finds storm damage, we capture it in a way that supports the claim from day one.
Documented findings
Photos, measurements, and a clear description of functional damage, not just what is visible from the eave, so the full scope is on the record.
Xactimate estimates
We prepare repair estimates in Xactimate, the industry-standard platform carriers use, which allows direct line-item comparison against the adjuster's scope.
On-site adjuster meetings
For any client who requests it, we walk the roof with the adjuster, present our documentation, and make sure the full scope of damage is evaluated.
A note on deductibles
Deductible waiving is illegal under Colorado law. Any contractor who offers to waive your deductible creates legal exposure for you and for them. Precision Exteriors will never make that offer.
How a Precision Roof Inspection Works
Direct answer: Five clear steps, from scheduling within days through an honest repair, replace, or nothing-needed recommendation, with photos of everything along the way.
Schedule
Call or book online. Most inspections in the Denver Metro are scheduled within a few days, often the same week.
Close-Range Inspection
We get on the roof and examine shingles, flashing, penetrations, vents, and gutters, plane by plane.
Photo Documentation
Every finding is photographed, good and bad, so nothing is left to a verbal description.
Written Assessment
You receive a plain-language report on your roof's condition and the issues that matter.
Honest Recommendation
Repair, replace, or nothing needed, with the reasoning explained before any commitment.
Why Denver roofs need close-range inspections
Denver's position in Hail Alley and its high-altitude UV exposure age roofs faster than most climates, which is why annual, documented checks matter here.
The Precision Warranty
Inspected by a Licensed, Certified Denver Roofer
When an inspection leads to work, that work is backed by the Precision Warranty: a 10-year workmanship warranty, plus the enhanced manufacturer coverage our Owens Corning Preferred and CertainTeed Master certifications unlock.
Close-Range, Documented
A real on-roof inspection with photos of every finding, not a driveway guess.
Licensed and Verifiable
Colorado License #0248041, verifiable at dora.colorado.gov.
10-Year Workmanship Warranty
If work follows your inspection, our installation quality is covered for a full decade, in writing.
Why Homeowners Trust Our Denver Roof Inspections
Direct answer: A licensed, manufacturer-certified, locally proven team that gives honest findings every time, with insurance-ready documentation and photos you can see for yourself.
Licensed and verifiable
Colorado License #0248041, verifiable through the Colorado Division of Regulatory Agencies at dora.colorado.gov. In Denver's post-storm market, unlicensed inspectors appear frequently after major hail events.
Manufacturer-certified eyes
Owens Corning Preferred Contractor and CertainTeed Master Installer. Our inspectors evaluate your roof against the standards those manufacturers actually require, not a generic checklist.
Proven volume in your market
3,000+ completed Front Range projects since 2016, with 200+ in Denver, Aurora, and Montebello in 2024. We have inspected roofs like yours after the same storms that hit your neighborhood.
Honest findings, every time
If your roof is fine, we tell you it is fine. We regularly recommend no work at all. That honesty is why so many of our inspections come from referrals.
Insurance-ready documentation
We prepare findings in a format that supports a claim, including Xactimate estimates and adjuster-meeting attendance when storm damage is found.
You see the photos
Every inspection comes with photo documentation of the findings, so you make decisions based on evidence, not a sales pitch.
Related Exterior Services
An inspection is the front door to the rest of our work. When findings call for action, here is where to go next.
Roof Repair
Targeted Denver roof repair for leaks, shingles, flashing, and storm damage found during your inspection.
Roof Replacement
Full tear-off and impact-rated roof replacement, backed by manufacturer-certified warranties.
Emergency Roofing
24/7 emergency roof tarp and rapid response to stop water before it spreads.
Siding Services
Fiber cement, engineered wood and vinyl siding.
Gutter Services
Seamless gutters, leaf guards and downspouts.
Window Services
Energy-efficient window replacement, repair and installation.
See all of our work at the Denver roofing services hub.
Trusted Across the Front Range
Rated 4.6 stars on Google. Read our verified reviews on Google, Angi, Thumbtack, and Yelp. Read all reviews.
"The Precision team provided great customer service and results. Special thanks to Anthony for helping me through the insurance process and making sure the details were covered. The work was done on time, with a great clean-up."
"Great quality work, friendly service. Fast and clean service. I highly recommend them."
"They were great to work with. They showed up on time, they knew their stuff, and they did the work well. I would recommend them to anyone who needs a roof repair."
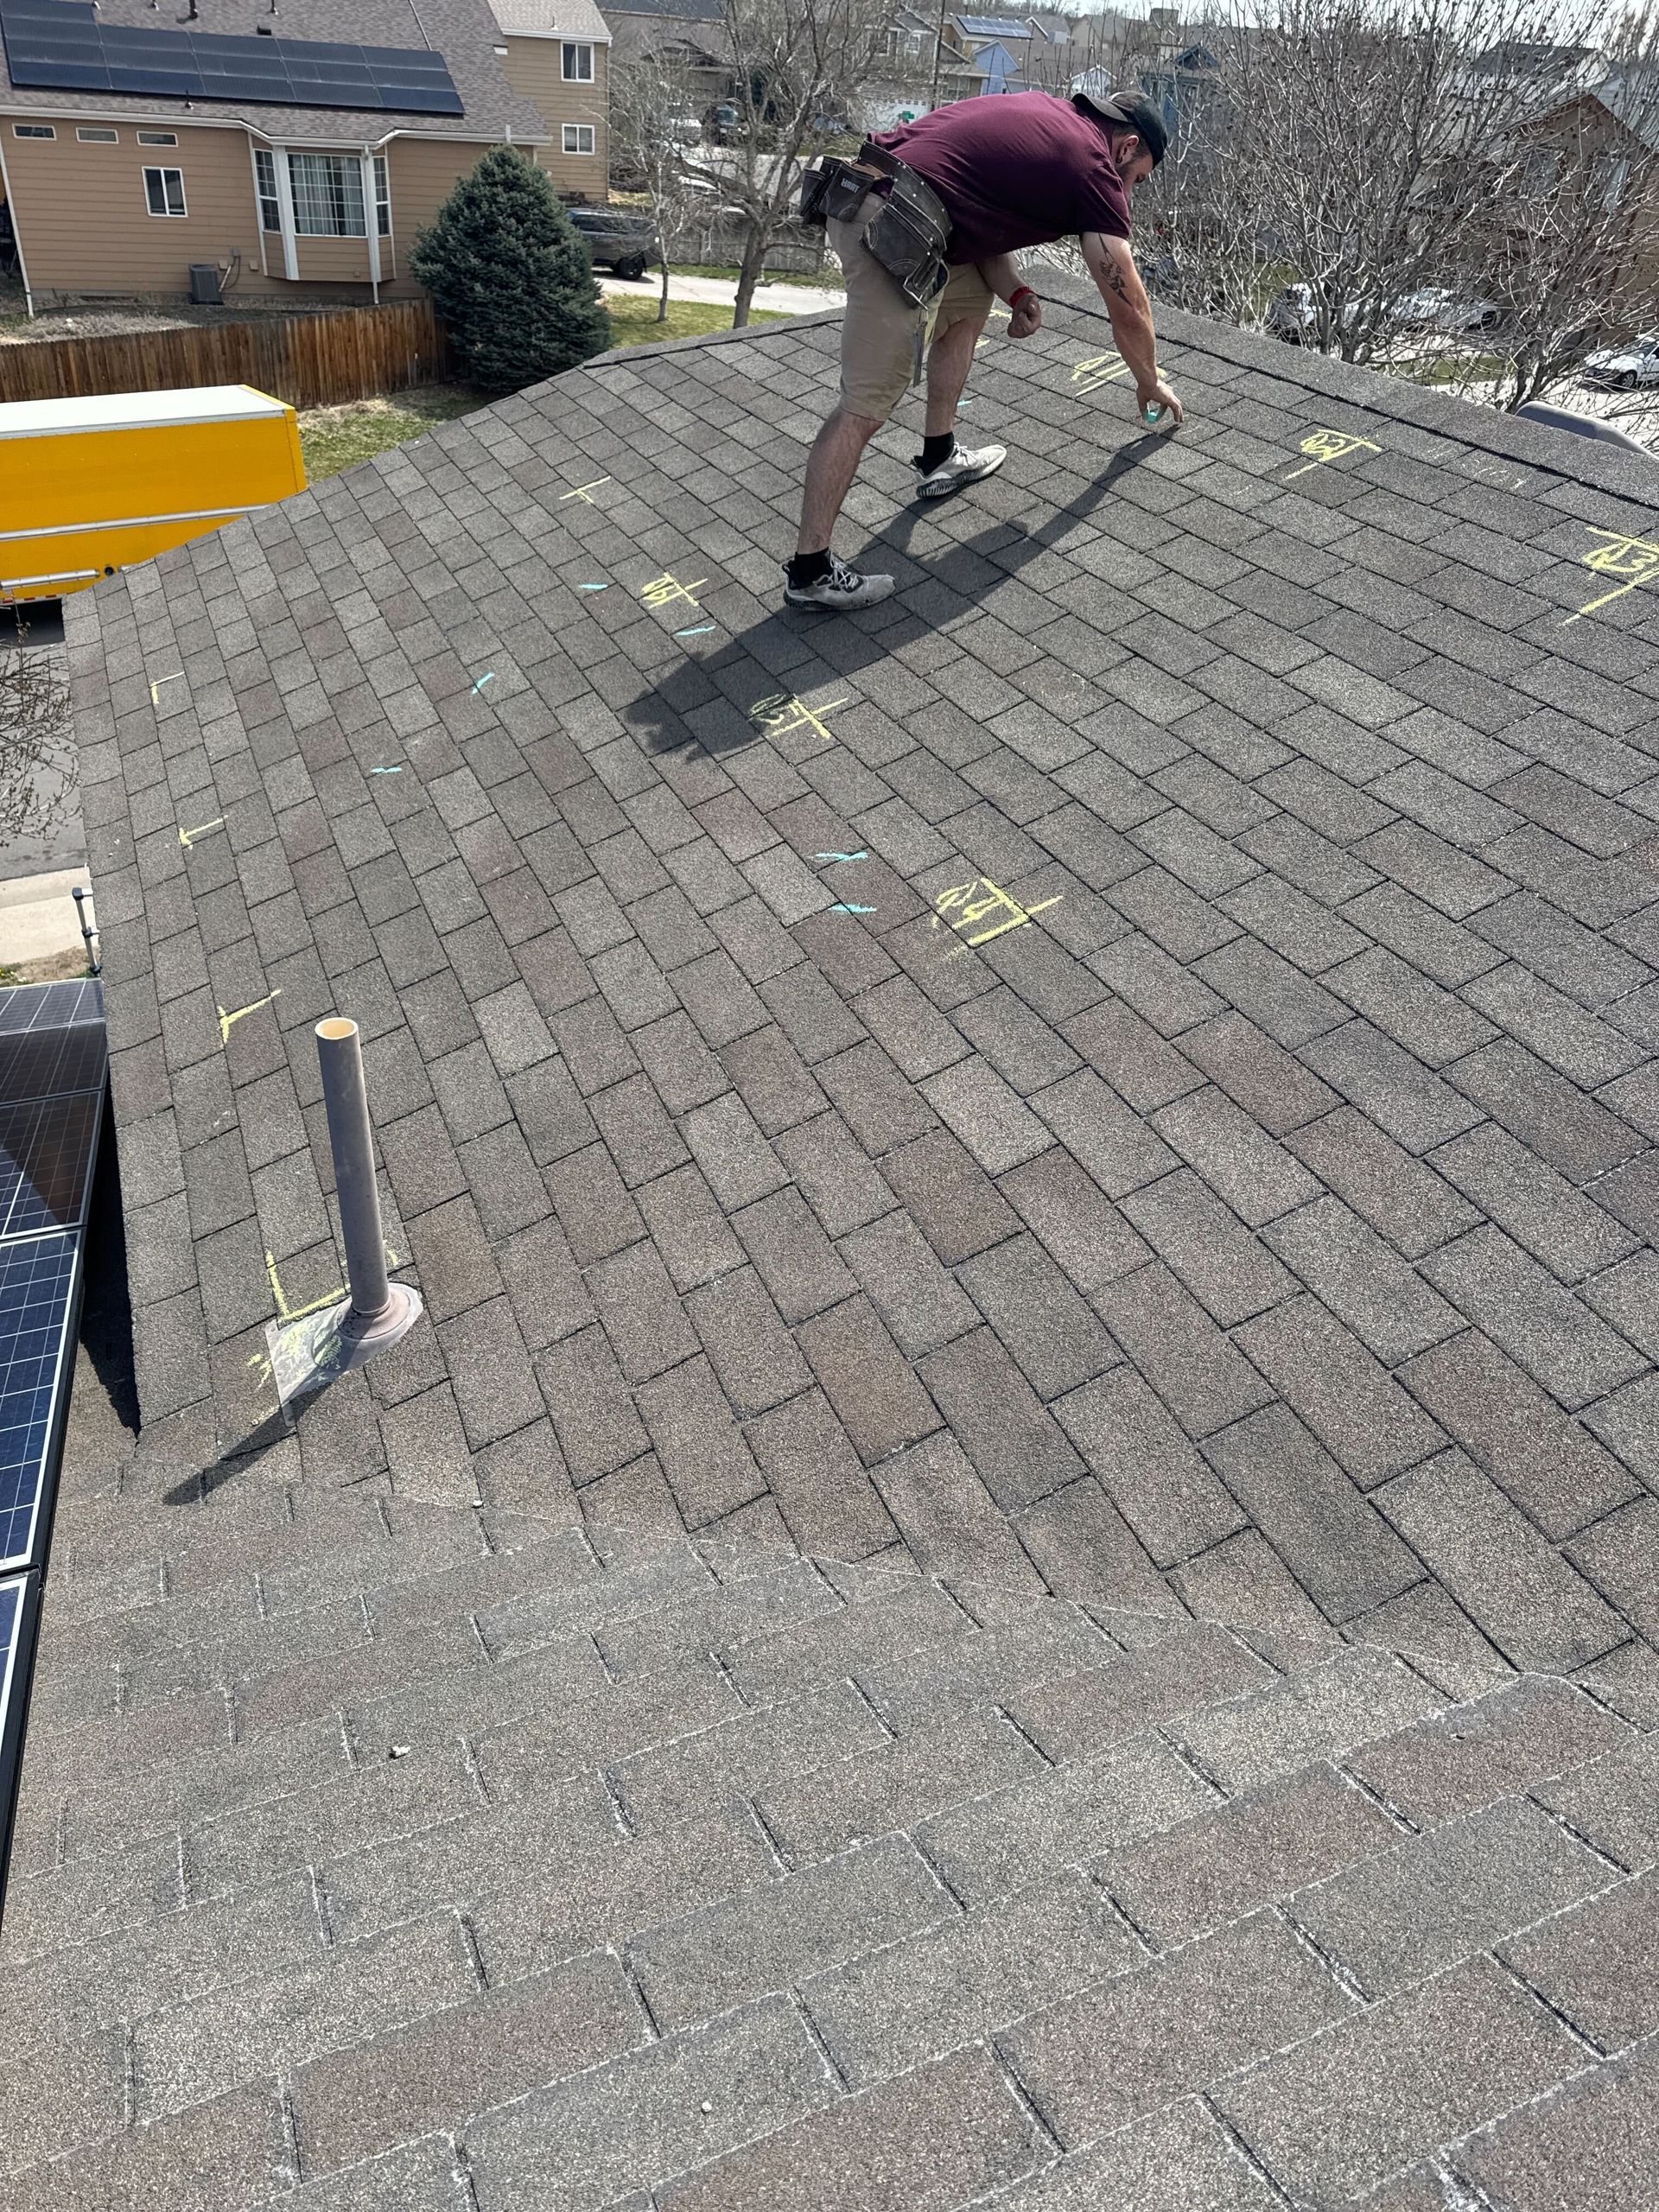 Close-range inspection, Denver metro
Roof Inspections Across Denver and the Front Range
Direct answer: Serving homeowners across Denver Metro and the Front Range: locally based and locally responsive, including Denver, Aurora, Thornton, Lakewood, Arvada, Centennial, Littleton, Castle Rock, and more.
Roof Inspection FAQs: Denver
Straight answers to what Denver homeowners ask before booking an inspection.
Is a free roof inspection really free and no obligation? +
How long does a roof inspection take? +
Do I need to be home for the inspection? +
Will you actually get on the roof? +
How often should I have my roof inspected in Denver? +
What happens if you find damage? +
Do you help with insurance claims after a storm inspection? +
Can you do a pre-purchase or pre-sale roof inspection? +
Do you charge if you do not find any damage? +
Why choose a local Denver contractor for my roof inspection? +
Protect Your Home: Start With a Free Roof Inspection
A no-pressure, photo-documented roof inspection from a licensed, local Denver roofing contractor. We proudly serve the Denver Metro Area.