The roof replacement process in Denver, step by step
Most homeowners replace a roof once or twice in a lifetime. This is the complete Denver roof replacement process, from the first inspection through the Denver permit, tear-off, deck check, installation, and final walkthrough, by a licensed local crew working since 2016.
Book your free inspection
Pick a time and we send a written report with photos within 24 hours.
What a roof replacement in Denver actually involves
Direct answer: A Denver roof replacement runs through seven stages: a roof-level inspection, material selection, a Denver building permit and code review, scheduling and prep, tear-off and deck inspection, full system installation, and a final walkthrough with written warranty documentation. Most single-family homes are completed in one day.
Precision Exteriors Restoration is a licensed Denver roofing contractor, Colorado License #0248041, and an Owens Corning Preferred Contractor providing full roof replacement for residential and multi-family properties across Denver and the Front Range. This page is a complete guide to what a replacement involves: what triggers the decision, how the process works from inspection through final walkthrough, what a complete roofing system includes component by component, what Denver code requires, how long it takes, how to prepare, and what the warranty covers.
Understanding the process before it begins, what happens when and what questions are worth asking, is what turns a significant project into a straightforward one. If you want the broader picture first, start with our Denver roofing services overview, or jump to the Process Denver service area page for crews and timelines near you.
When roof replacement is the right answer in Denver
Direct answer: Replacement is the right call when damage is distributed across the shingle field, when the system is near end of life in Denver's high-altitude UV, when tear-off reveals deck rot, or when the same roof has needed repair every 2 to 3 years. Isolated damage on a sound roof is a repair, not a replacement.
Standard architectural shingles in Denver typically reach end of service life at 20 to 22 years, faster than sea-level manufacturer ratings assume, because high-altitude UV intensity accelerates degradation. A hail or wind event that fractures the fiberglass mat across the primary elevations usually means replacing most of the field anyway, at which point a full system with a fresh warranty is more cost-effective. Not sure which way your roof leans? Our repair versus replacement in Denver guide walks the line item by item.
Get a free repair or replace assessment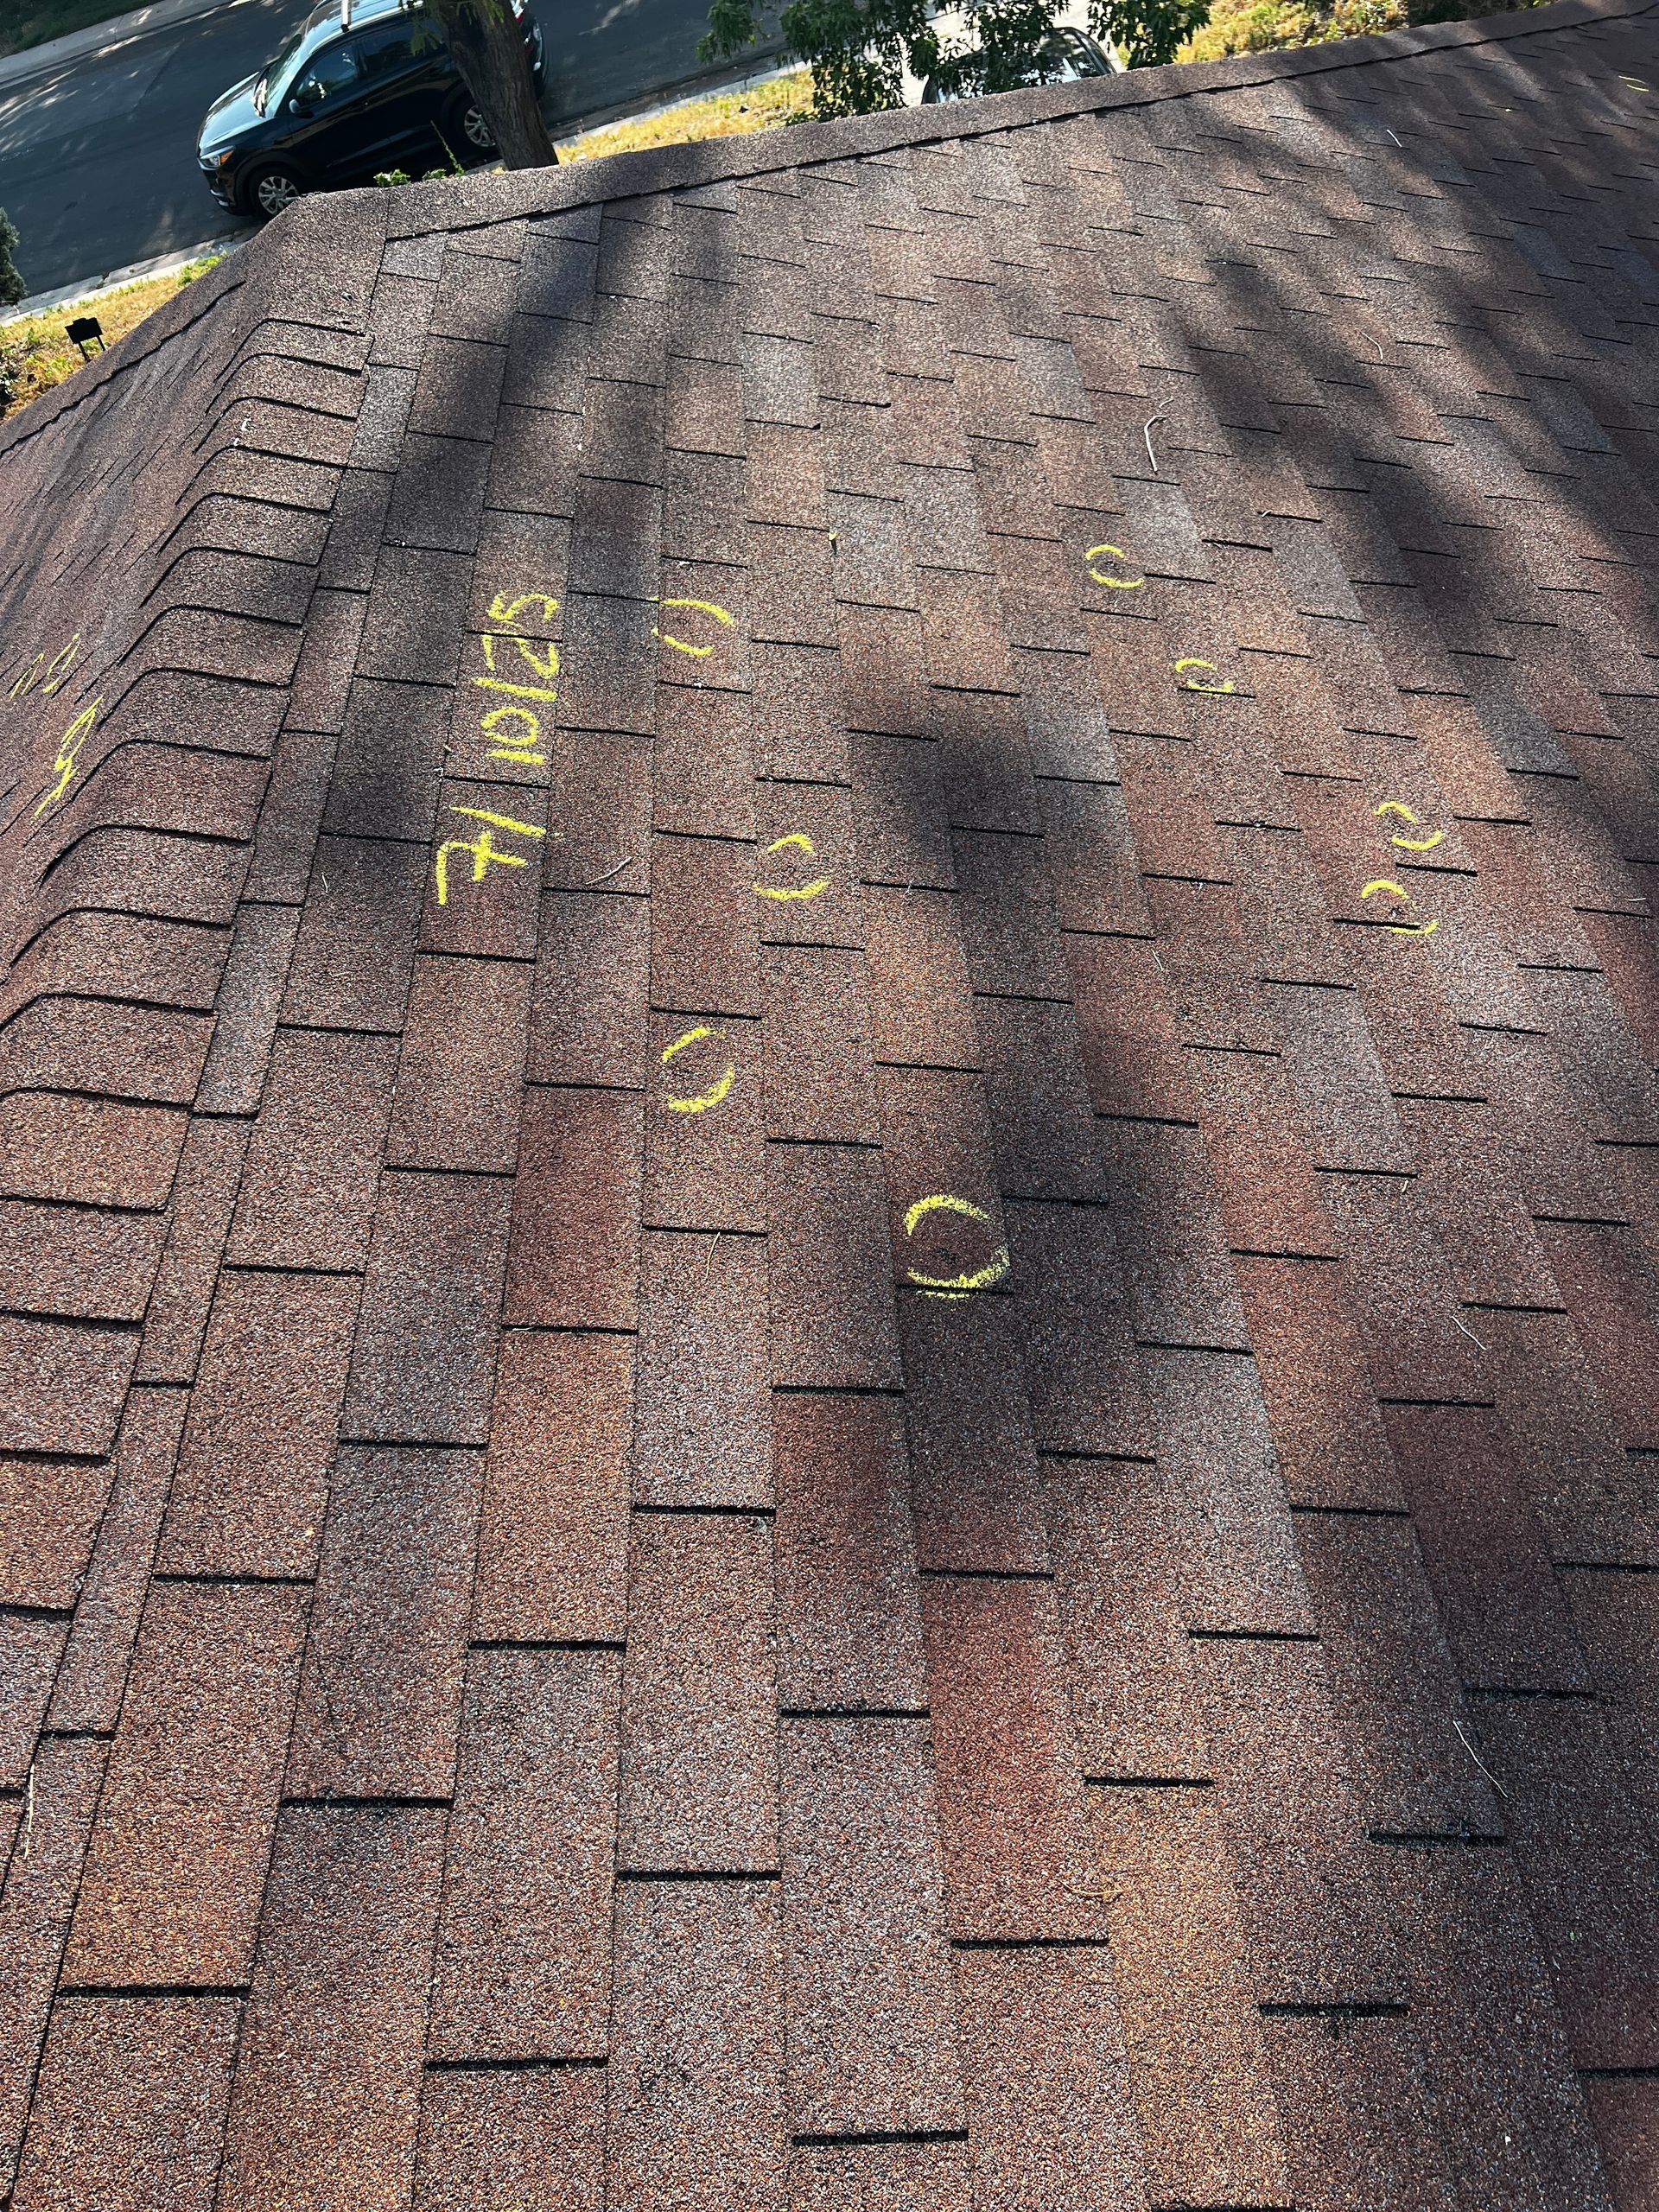 Distributed hail damage, Denver metro
The complete Denver roof replacement process
Direct answer: Each step has a clear purpose and a clear handoff, so you always know what is happening and why. Here is the full sequence we follow on every Denver replacement, including the deck inspection that only happens once the old roof is off.
Inspection and documentation
Every project begins with a roof-level assessment of every component, not a quick look from the ground. The inspection covers shingle field condition, deck integrity at exposed edges, flashing at every wall transition and chimney, pipe boots, and ventilation balance. It produces a photo documented findings report that defines the scope and provides independent documentation of conditions before any insurance adjuster visit.
Roof inspection in DenverMaterial selection
Material choice matters more in Denver than most US markets because of the exposure environment. Architectural shingles are the residential standard, but Class 4 impact-resistant shingles are the Denver-specific upgrade worth discussing on every replacement.
- Class 4 shingles pass UL 2218 testing for 2-inch impacts, close to the 1.5 to 2-inch hailstones Front Range storms regularly produce.
- Many Colorado carriers offer 10 to 30% premium discounts for Class 4 installs, partly offsetting the product cost.
- We use Owens Corning and CertainTeed product lines, with synthetic underlayment as standard for tear resistance and weather tolerance.
Denver building permit and code
Roof replacements in Denver require a building permit through the Department of Community Planning and Development. It is required by code, not a formality, and uninspected work can create complications at property sale. We handle permit application and coordination on every project, and permit fees are included in the project total. Denver-specific requirements that affect every replacement:
- Ice and water shield at the eave, a minimum of 24 inches past the interior wall line, to manage freeze-thaw and ice dams.
- Metal drip edge at eave and rake, required under code and manufacturer warranty.
- A two-layer maximum on asphalt shingles, so a third layer means full tear-off.
- Ventilation of at least 1 square foot of free area per 150 square feet of attic, or 1 to 300 with balanced intake and exhaust.
Scheduling and pre-installation prep
Once materials are confirmed and the permit is obtained, the project is scheduled, with material delivery the day before or the morning of installation. We share the date and arrival window in advance. Before installation day, move vehicles out of the work zone, secure fragile items on exterior walls and near the foundation, plan for pets since sustained impact noise is stressful for dogs, and alert anyone with noise sensitivity. You do not need to be present; we communicate clearly before, during if anything significant is found, and after.
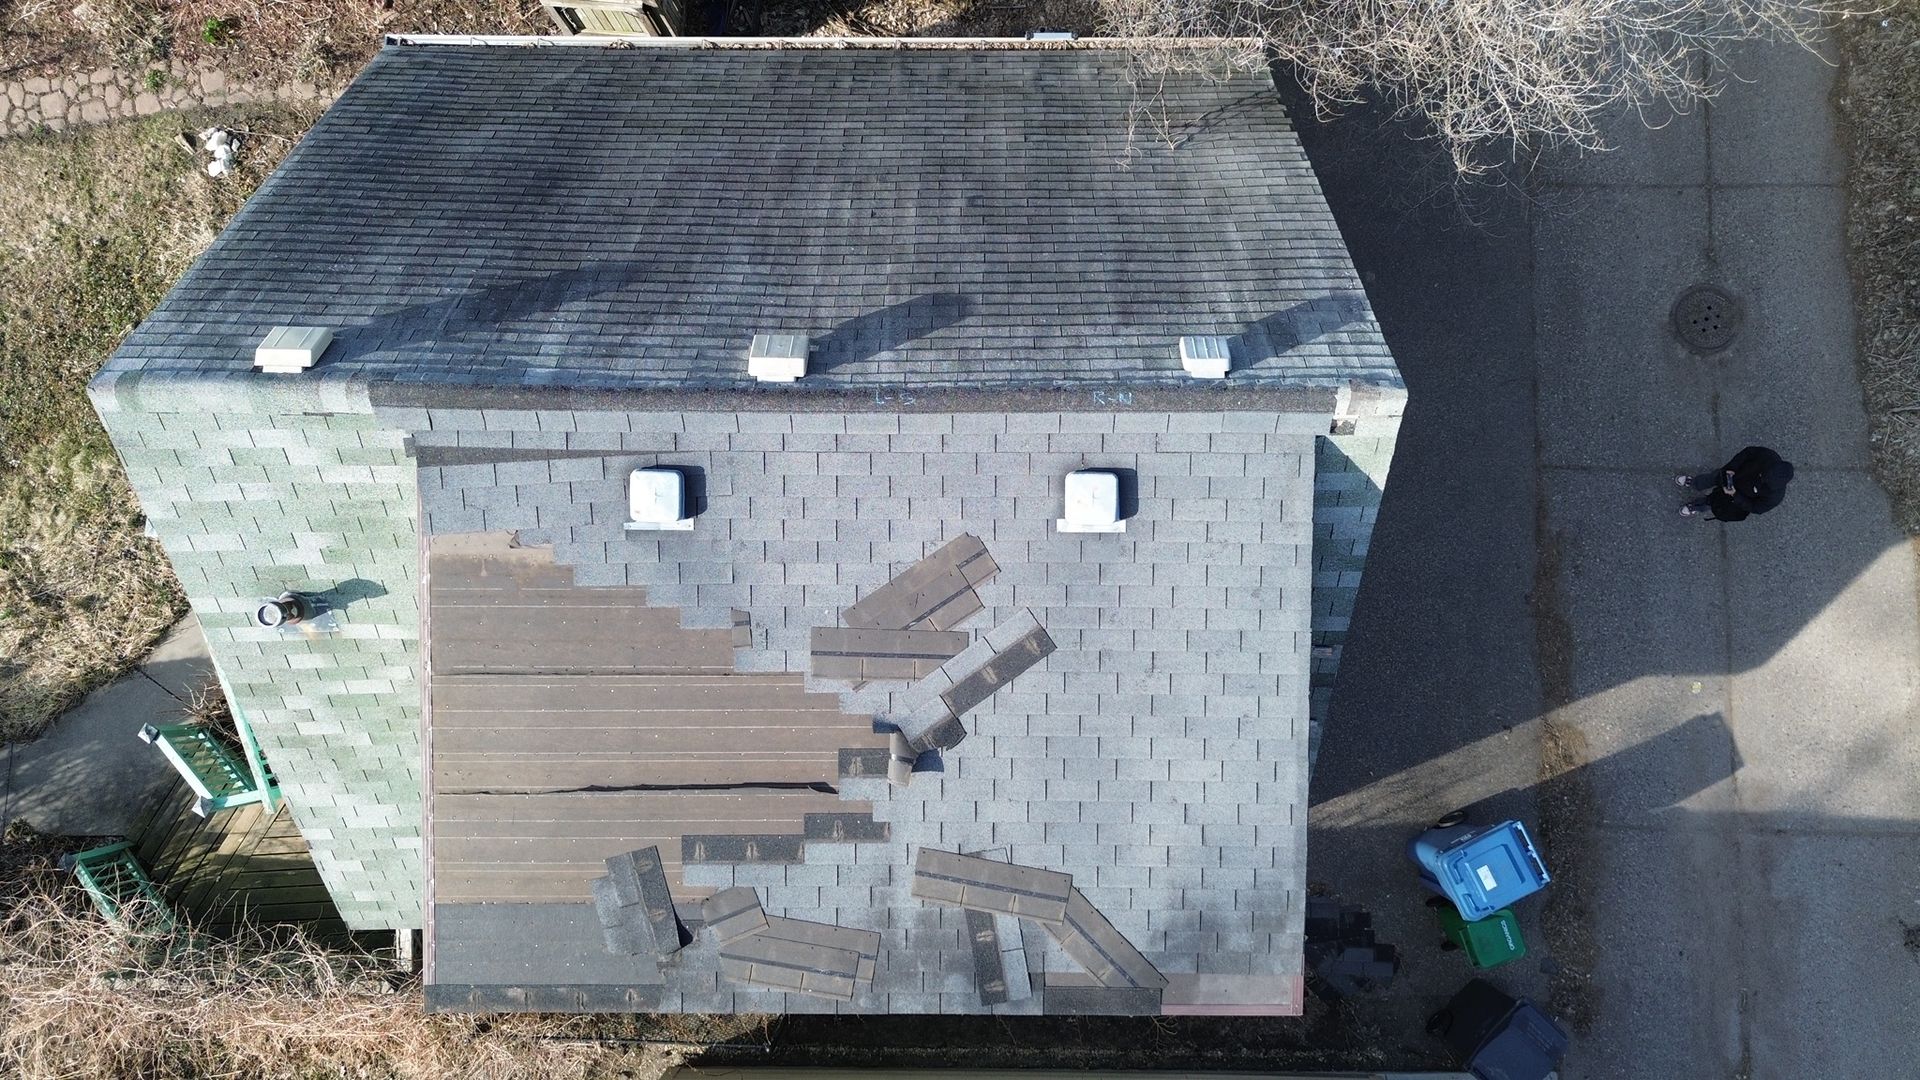
Tear-off and deck inspection
Tear-off strips the existing shingles, underlayment, and all flashings to bare deck, and this is the only point the full deck condition is revealed. We inspect every section for soft or delaminated areas that will not hold nails, water staining that reveals historical leak pathways, prior repair patches, and fastener condition. Soft or compromised deck is replaced before installation proceeds, documented with photos and priced per sheet of OSB as a separate line item.
Hidden deck damage is more common in Denver's established 1960s through 1990s housing stock, where freeze-thaw cycling and years of unaddressed shingle wear add up. We find deck damage that previous contractors missed on a regular basis in these older neighborhoods.
Full system installation
With a clean, solid deck, the new system goes on in the correct sequence, because the order matters for both performance and code compliance: drip edge at the eave, ice and water shield, synthetic underlayment, drip edge at the rakes, valley flashing, starter strip, field shingles to manufacturer nailing spec, step and counter flashing at wall and chimney transitions, new pipe boots at every penetration, ridge vent, and ridge cap shingles. We finish with a magnetic rollout to capture fallen fasteners in the lawn and a full debris cleanup.
Final inspection and walkthrough
Before the crew leaves, we confirm every component is installed correctly, the ridgeline is straight, all penetrations and transitions are flashed, and the property is clean. We walk the finished work with you, or communicate findings in detail if you were not present, covering what was installed and why, any deck repair findings from tear-off, insurance file documentation, and your warranty terms. Every replacement carries a 10-year workmanship warranty in writing.
How long does a Denver roof replacement take?
Direct answer: Most standard single-family Denver roof replacements are completed in one day, roughly an 8 to 10 hour process for an average 2,500 to 3,500 square foot home. Complexity, deck repair scope, roof size over 4,000 square feet, and weather can extend it into a second day.
Tear-off, deck inspection, repairs, and a complete new system through cleanup for an average single-family home.
The usual on-site window for a 2,500 to 3,500 square foot roof, weather permitting.
Denver's afternoon thunderstorm pattern means early morning starts and active weather monitoring on summer installs. We do not install in rain or forecast rain.
What a roof replacement costs in Denver
Direct answer: A typical full roof replacement in Denver lands between $8,000 and $20,000. Asphalt shingle runs about $4 to $7 per square foot, standing-seam metal about $7 to $18, and tile about $10 to $18, depending on size, pitch, and material. When storm or hail damage is the cause, an approved claim often covers most of the cost beyond your deductible.
Asphalt shingle
The most common Denver choice, with Class 4 impact-resistant options that resist hail.
Standing-seam metal
Long lifespan and excellent snow shedding for Front Range exposure.
Tile
Premium durability and curb appeal where structure and budget allow.
 Storm documentation, Denver metro
Denver roof replacement and insurance claims
Direct answer: Most Colorado homeowner policies pay replacement cost value, which pays in two parts: the actual cash value at claim approval, and the recoverable depreciation once the work is completed and documented. We provide the completion photos, material invoices, and permit records that release that second payment.
Many Denver homeowners on replacement cost value policies miss the second payment simply because they never submit the completion documentation. We meet your adjuster on site, build the scope so legitimate line items like hail-dented gutters are not left behind, and hand off a clean insurance file at close-out. See our insurance and storm damage guidance for the full claim walkthrough.
Why the Denver process is different
Denver sits in Hail Alley, where storm frequency, freeze-thaw cycling, and high-altitude UV put roofs under more stress than almost anywhere in the country, which is why the local process leans hard on documentation and code.
What your free roof inspection includes
Direct answer: No cost and no pressure. You receive a roof-level evaluation, a written report with photos in 24 hours, a storm and hail assessment for insurance, an honest repair or replace recommendation, clear material and warranty options, and a transparent itemized estimate.
Exactly what you receive
- Full exterior roof evaluation by a certified inspector
- Written report with damage photos within 24 hours
- Hail and storm damage assessment for insurance
- Honest repair-versus-replace recommendation
- Class 4 and warranty options explained clearly
- Transparent, itemized estimate with no surprises
The Precision Warranty
Protected in writing, for the long run
Every Precision Exteriors Restoration replacement is backed in writing, so your Denver roof stays protected long after our crew leaves.
10-Year Workmanship Warranty
The Precision Warranty covers the quality of our installation for a full decade, documented in writing at close-out.
Certified-Installer Manufacturer Warranty
As an Owens Corning Preferred Contractor and CertainTeed Master Applicator, we register manufacturer-backed material warranties most contractors cannot offer.
Licensed, Insured, Local Since 2016
Colorado License #0248041, BBB A+ accredited, with 3,000+ completed Front Range projects.
We take the risk off your shoulders
A roof replacement should feel safe from day one. Between manufacturer warranties, hands-on insurance help, and flexible financing, the path forward is low risk.
Workmanship and material warranties
Owens Corning Preferred and CertainTeed Master credentials unlock the strongest warranties available, covering both your materials and our installation.
We handle your insurance claim
We document the damage, meet your adjuster on site, and provide the completion file that releases your recoverable depreciation.
Flexible financing available
Ask about financing that lets you protect your home now and spread the cost into manageable payments.
 Storm response, Denver metro
Denver metro replacement service area
Direct answer: We run replacement crews across Denver and the Front Range, including older established neighborhoods like Park Hill, Washington Park, Berkeley, and University Hills, where 1960s through 1990s housing stock often hides deck damage, out to Aurora, Arvada, Thornton, Lakewood, and Castle Rock.
Denver roof replacement process questions, answered
How long does a roof replacement take in Denver?
Do I need a permit to replace my roof in Denver?
What does Denver code require on a roof replacement?
Should I choose Class 4 impact-resistant shingles in Denver?
What happens if my roof deck is damaged?
How much does a roof replacement cost in Denver?
Do I need to be home during the replacement?
What warranty comes with a Precision replacement?
Start your Denver roof replacement the right way
Get a written report with photos in 24 hours. We inspect, we document, we handle the Denver permit and your insurance claim, and we walk the finished roof with you.
Roof Replacement Process in Denver — What to Expect, Step by Step
Precision Exteriors Restoration is a licensed Denver roofing contractor (Colorado License #0248041) and Owens Corning Preferred Contractor — providing full roof replacement services for residential and multi-family properties throughout Denver and the Front Range. This page is a complete guide to what a roof replacement actually involves: what triggers the decision, how the full process works from initial inspection through final walkthrough, what a complete roofing system includes component by component, what Denver's specific code requirements mean for your project, how long it takes, how to prepare, and what the warranty covers.
Most homeowners replace their roof once or twice in a lifetime. Understanding the process before it begins — what happens when, what you should expect each step to involve, and what questions are worth asking — is what turns a significant project into a straightforward one.
When Roof Replacement Is the Right Answer in Denver
Roof replacement is not automatically the answer after every storm or every inspection finding. The decision belongs at the intersection of three factors: the extent and distribution of damage, the current age and condition of the existing system, and the cost-effectiveness of repair vs. replacement for this specific situation.
Replacement is typically the right answer when:
The shingle system is at or near end of service life in Colorado's UV environment — 20–22 years for standard architectural shingles at Denver's elevation, where high-altitude UV intensity accelerates degradation faster than sea-level manufacturer ratings assume. A roof that has reached this threshold on an aging system often makes repair uneconomical: you're investing repair costs into a system with limited remaining useful life.
A hail or wind event has produced distributed damage across a significant portion of the shingle field — not isolated to one slope or one area, but widespread fiberglass mat fracture across the primary elevations. Repairing distributed hail damage typically means replacing most of the shingle field, at which point a full system replacement with a new warranty is more cost-effective.
The deck has hidden damage — rot, delamination, or structural compromise — that has been discovered during repair work or prior inspection. Deck repairs combined with a roof that has limited remaining service life typically justify replacement.
Multiple repair cycles have already addressed isolated failures without resolving the underlying system deterioration. When the same roof has needed repair every 2–3 years, the system has likely reached the point where replacement is the right answer.
Replacement is not automatically the answer when:
Damage is isolated to a single slope or a limited area on an otherwise sound system with meaningful remaining service life. Wind damage to ridge caps on the north elevation of a 10-year-old roof in good condition is a repair, not a replacement.
Roof Repair vs. Replacement — Denver →
The Complete Denver Roof Replacement Process — Step by Step
Step 1 — Inspection and Documentation
Every replacement project begins with a comprehensive inspection. This is not a quick visual from the ground — it is a roof-level assessment of every component of the existing system.
What the inspection covers:
Shingle field condition — granule adhesion, sealant strip integrity across the field, fiberglass mat condition for hail-related fracture, tab edge brittleness, UV oxidation pattern. The inspection documents the full picture: what's storm-related, what's age-related wear, and what constitutes a combination of both.
Deck integrity — visible deck condition through any existing penetrations or at exposed edges; documentation of any spongy areas, visible delamination, or prior water staining that suggests underlying moisture damage. Full deck condition is only definitively assessed at tear-off.
Flashing condition — step flashings at all wall transitions, counter flashing at chimney bases, valley flashing type and condition, pipe boot condition and seal integrity at every penetration.
Ventilation assessment — intake at the soffits, exhaust at or near the ridge, and whether the current system is properly balanced. Unbalanced ventilation shortens shingle life and contributes to ice dam formation in Denver's freeze-thaw season. If the ventilation system needs correction, this is the time to address it.
Gutter condition — denting from hail, pull-away from fascia on windward elevations, slope and drainage performance. Gutter findings are documented alongside roofing findings because gutter damage from the same event is a legitimate insurance line item that adjusters frequently miss.
The inspection produces a photo-documented findings report that serves two purposes: it defines the replacement scope, and it provides independent documentation of conditions before the insurance adjuster's visit if a claim is involved.
Step 2 — Material Selection
Material selection for a Denver roof replacement is more consequential than it is in most US markets because of Denver's specific exposure environment. The choices made here determine system performance over the next 20–25 years.
Shingle grade and product line. Architectural (dimensional) shingles are the standard for Denver residential installations. Within the architectural category, there is meaningful variation in fiberglass mat weight, granule coverage, and sealant formulation that affects durability in Colorado's hail and UV environment.
Class 4 impact-resistant shingles — the Denver-specific upgrade worth discussing on every replacement. UL 2218 Class 4 certification is achieved through testing that simulates 2-inch steel ball impacts — roughly equivalent to the 1.5–2-inch hailstones that Front Range hail events regularly produce. Class 4 shingles sustain significantly less fiberglass mat fracture from qualifying hail events than standard shingles, and many Colorado insurance carriers offer premium discounts of 10–30% for Class 4 installations that partially offset the product cost premium. In a market where the average homeowner deals with 2–3 qualifying hail events over a 20-year roof life, the Class 4 math is frequently compelling.
We use Owens Corning and CertainTeed product lines on Denver replacement projects. As an Owens Corning Preferred Contractor, we offer the Owens Corning Platinum Protection warranty — a 50-year non-prorated limited warranty on materials combined with a contractor labor warranty — which is available exclusively through Preferred Contractors regardless of which Owens Corning products a non-credentialed contractor installs.
Underlayment. The layer beneath the shingles is the secondary water barrier — what protects the deck if a shingle fails. Standard felt underlayment is the minimum; synthetic underlayment offers better tear resistance, moisture resistance during installation, and longer exposure tolerance if installation is interrupted by weather. We use synthetic underlayment on Denver replacement projects as standard.
Ice and water shield — see the Denver code requirements section below.
Ventilation components — ridge vent, soffit vents, or power ventilation depending on the attic configuration. Ventilation is specified to balance intake and exhaust for the specific attic geometry.
Flashing — all flashings are replaced as part of a complete system installation. Using old flashings with a new shingle installation is a shortcut that creates premature failures at the most common leak points.
Step 3 — Denver Building Permit and Code Requirements
Roof replacements in Denver require a building permit through Denver's Department of Community Planning and Development. This is not optional and not a formality — it is required by Denver building code, and uninspected roof replacements can create complications at property sale. We handle permit application and coordination on every replacement project; permit fees are included in the project total.
Denver-specific code requirements that affect every replacement:
Ice and water shield at the eave line. Denver's climate — specifically the freeze-thaw cycling and ice dam formation potential at the eave — requires self-adhering ice and water shield membrane installed at the eave from the drip edge up the slope a minimum of 24 inches beyond the interior wall line. This is a code requirement in Denver, not an optional upgrade. On older replacement projects where the previous contractor skipped this component, we install it correctly.
Drip edge. Metal drip edge at the eave and rake is required under Denver building code and under shingle manufacturer warranty requirements. Drip edge installed under the starter strip at the eave and over the underlayment at the rake creates the correct water management profile at the roof edge.
Layer limits. Denver building code limits asphalt shingle roofing to two layers maximum — a new shingle installation over one existing layer is permissible; installation over two existing layers is not. If tear-off reveals that the property already has two layers of shingles, complete removal of all existing roofing is required before installation. We assess layer count during inspection and include tear-off scope accordingly.
Ventilation balance requirements. Denver building code requires a minimum of 1 square foot of free ventilation area per 150 square feet of attic floor area (or 1:300 with balanced intake/exhaust). Ventilation corrections required to meet code are documented before installation and included in the project scope.
Step 4 — Scheduling and Pre-Installation Preparation
Our scheduling process. Once materials are confirmed and the permit is obtained, the project is scheduled. Material delivery is typically the day before or the morning of installation. We communicate the installation date and arrival time window in advance so you can make any necessary arrangements.
What homeowners should do before installation day:
Move vehicles out of the garage and away from the work zone — roofing debris falls unpredictably, and vehicles in the work area are at risk of minor impact. If you have a detached garage or outbuildings in the debris fall zone, we'll discuss positioning before installation begins.
Secure or cover anything fragile on exterior walls or near the house perimeter — hanging decorations, satellite dishes, outdoor art, planters near the foundation. Vibration from tear-off and installation transfers through the structure; items hanging on interior walls near the roof perimeter (mirrors, framed art) can shift.
Make arrangements for pets. Roofing is loud — sustained impact noise for most of the installation day. Dogs in particular find the noise stressful. Pets should be kept indoors in a room away from the noise, or arrangements should be made for them to be elsewhere during installation.
Alert any household members with noise sensitivity. The installation day is not the day for working from home in the room directly below the work area.
You do not need to be present during installation. We communicate clearly before, during (if anything significant is found at tear-off), and after with the final walkthrough.
Step 5 — Tear-Off and Deck Inspection
Tear-off is the first phase of installation day and the most important quality control step of the entire project. This is when the full condition of the roof deck is revealed — and it cannot be fully assessed before this point regardless of how thorough the pre-installation inspection was.
What happens during tear-off:
The existing shingles, underlayment, and all penetration flashings are stripped to bare deck. The deck surface is inspected across every section of the roof — not just the visible edge areas, but the full field.
What we look for at the deck:
Soft or spongy sections — areas where the deck has absorbed moisture and the OSB or plywood has delaminated. These sections flex underfoot and won't hold nails correctly. Soft deck sections must be replaced before installation proceeds.
Staining patterns — water staining on the deck surface that reveals historical leak pathways, even if the deck is structurally sound. Staining patterns help identify whether flashings and penetrations are the source of prior moisture intrusion.
Prior repair patches — sections where previous work was done to the deck. Patch areas need assessment to confirm they're solid and properly integrated before installation over them.
Fastener condition — existing nail or staple patterns that reveal installation quality of the previous roof system.
Deck repairs. Any deck section that is soft, delaminated, or structurally compromised is replaced before installation proceeds. We document deck findings with photos and discuss any repairs needed before proceeding. Deck repair is typically priced per sheet of OSB replacement as a separate line item from the base replacement contract; we identify any areas with obvious pre-existing concerns during the initial inspection and flag them as potential deck items so there are no scope surprises.
Why this step matters more in Denver than most markets. Denver's freeze-thaw cycling, historic ice dam issues on older housing stock, and the incremental moisture intrusion that years of unaddressed shingle degradation produce mean that hidden deck damage is more common in Denver's established neighborhoods than in drier or less temperature-variable markets. We find deck damage that previous contractors missed on a regular basis in Denver's 1960s–1990s housing stock.
Step 6 — Full System Installation
With a clean, solid deck, the new roofing system is installed in the correct sequence. Each component serves a specific function; the sequence matters for both performance and code compliance.
The installation sequence for a complete Denver roof replacement:
1. Drip edge at the eave — installed first, over the fascia board, providing the foundation for the water management profile at the roof edge.
2. Ice and water shield at eaves — self-adhering membrane from the drip edge up the slope, minimum 24 inches past the interior wall line. In Denver, we typically install ice and water shield at all valleys and high-risk penetration areas as well, not just at the eave.
3. Synthetic underlayment — installed across the full field over the ice and water shield, overlapping courses from eave to ridge. Provides secondary protection across the entire deck surface.
4. Drip edge at the rakes — installed over the underlayment on the rake edges, completing the drip edge perimeter.
5. Valley flashing — either closed-cut or open metal valley, installed before the field shingles.
6. Starter strip — a specialized starter course at the eave providing the correct overhang and sealing surface for the first full shingle course.
7. Field shingles — installed in overlapping courses from eave to ridge, following manufacturer pattern and exposure specifications. Nailing pattern and fastener placement are specified by the manufacturer and required for warranty compliance.
8. Step flashings at wall transitions — individual step flashings integrated with each course at every roof-to-wall transition. Counter flashing at chimney bases is installed over the step flashing layer.
9. Pipe boots at all penetrations — new pipe boots at every plumbing vent, properly sized and sealed.
10. Ridge vent — installed at the ridge line before ridge cap application.
11. Ridge cap shingles — hip and ridge caps completing the ridgeline.
12. Final nail check and debris removal — magnetic rollout to capture fallen fasteners in the lawn and landscaping, full debris removal from the property.
Step 7 — Final Inspection and Walkthrough
After installation is complete, we conduct a final inspection of the completed system before the crew leaves. The inspection confirms that all components are installed correctly, the ridgeline is straight, all penetrations and transitions are properly flashed, and the property is clean.
We then walk through the completed work with the homeowner — or communicate findings in detail if the homeowner was not present. The walkthrough covers: what was installed and why, any deck repair findings from tear-off, documentation for the insurance file if the project was claim-related, and the warranty terms and documentation.
Warranty documentation. Every Precision Exteriors replacement project carries a 10-year workmanship warranty documented in writing. For Owens Corning Platinum Protection qualifying installations, manufacturer warranty registration is completed as part of project close-out. On insurance replacement projects, completion documentation — photos, material invoices, permit inspection records — is provided to support the recoverable depreciation payment on RCV policies.
How Long Does a Denver Roof Replacement Take?
Most standard single-family residential roof replacements in Denver are completed in one day. The crew arrives, tears off the existing system, completes the deck inspection and any required repairs, and installs the complete new system through cleanup — typically an 8–10 hour process for an average 2,500–3,500 square foot home.
What extends the timeline:
Roof complexity — multiple hips, valleys, dormers, skylights, chimneys, and other penetrations increase installation time. A straightforward hip-and-gable ranch finishes faster than a complex colonial with multiple dormers.
Deck repair scope — if significant deck replacement is required at tear-off, installation may extend into a second day.
Roof size — larger homes with 4,000+ square feet of roofing area may require two days regardless of complexity.
Weather — we do not install in rain or forecast rain during installation. Denver's afternoon thunderstorm pattern in June–August means morning start times and weather monitoring are standard practice for summer replacements.
The night-before-completion situation. On rare occasions — typically when a weather event interrupts a multi-day project — the torn-off deck is protected with tarps overnight. This is a covered situation with proper tarping, not a safety risk, but it's worth knowing it can happen on complex projects in Denver's unpredictable summer weather.
Denver Roof Replacement and Insurance Claims
Many Denver roof replacements follow storm events, and the insurance process affects the project timeline and scope.
Replacement cost value (RCV) vs. actual cash value (ACV). Most Colorado homeowner policies pay RCV — the full cost to replace the damaged system at current prices. RCV policies typically pay in two installments: the actual cash value (replacement cost minus depreciation) at claim approval, and the recoverable depreciation after the work is completed and documented. Many Denver homeowners on RCV policies miss the second payment because they don't know to submit the completion documentation. We provide the documentation package needed to collect the full RCV benefit.
Supplement documentation. Insurance adjuster scopes frequently miss legitimate items — code-required upgrades like drip edge and ice and water shield that weren't present on the old roof, pipe boot replacements, ridge vent installation, or partial gutter replacement on the same elevation. We prepare supplement documentation for items missed in the initial adjuster scope as a standard part of insurance replacement projects.
Timing the replacement. Colorado homeowner policies typically have a deadline for completing repairs after a claim is approved — commonly 12–24 months from the date of loss. Missing this window can result in policy cancellation or loss of the RCV benefit. If you have an approved claim, confirming the replacement deadline and scheduling accordingly is important.
Roof Replacement Process Denver — FAQs
How long does a roof replacement take in Denver?
Most residential Denver roof replacements are completed in one day — an 8–10 hour process from crew arrival through cleanup. Larger homes (4,000+ sq ft), complex roof geometry with multiple penetrations and dormers, or projects where significant deck repair is required at tear-off may extend to two days. Weather interruptions are the primary variable; we do not install in rain and Denver's summer afternoon storm pattern sometimes affects scheduling.
Does Denver require a building permit for roof replacement?
Yes. Roof replacements in Denver require a building permit through Denver's Department of Community Planning and Development. Precision Exteriors handles permit application and coordination on every project — permit fees are included in the project total. An uninspected roof replacement creates complications at property sale; don't skip the permit.
What is ice and water shield and do I need it in Denver?
Ice and water shield is a self-adhering waterproof membrane installed at the eave line before underlayment and shingles — it provides secondary protection at the area most vulnerable to ice dam backup. Denver building code requires it at the eave, minimum 24 inches inside the interior wall line. It's not an upgrade you can decline on a Denver replacement — it's a code requirement and manufacturer warranty requirement.
How many layers of shingles can I have in Denver?
Denver building code limits asphalt shingle roofing to two layers maximum. A new installation over one existing layer is permissible; three total layers is not. If your property already has two layers, complete removal of all existing roofing is required before new installation. We assess layer count during the initial inspection.
Do I need to be home during the roof replacement?
No — you don't need to be present during installation. We communicate the schedule in advance, contact you if any deck repair findings at tear-off require a scope conversation, and conduct a final walkthrough (or provide a detailed communication if you're not available) after completion. What you do need to do before installation: move vehicles from the work zone, secure fragile items near the exterior perimeter, and make arrangements for pets.
What warranty comes with a Denver roof replacement from Precision Exteriors?
Every project carries a 10-year workmanship warranty — written, documented, specific term. For qualifying Owens Corning full-system installations, we offer the Owens Corning Platinum Protection warranty: a 50-year non-prorated limited warranty on materials. Platinum Protection is available exclusively through Owens Corning Preferred Contractors. Manufacturer warranty registration is completed as part of project close-out.
What is recoverable depreciation and how do I get it after a roof replacement?
If your homeowner's policy is replacement cost value (RCV), the insurance company pays in two installments. The first payment — actual cash value — arrives at claim approval and covers replacement cost minus depreciation holdback. The second payment — recoverable depreciation — is released after you complete the work and submit documentation showing the replacement was completed. We provide the completion documentation package (photos, material invoices, permit completion records) needed to collect the second payment. Many Denver homeowners miss this payment because they don't know to request it.
Can I choose Class 4 impact-resistant shingles for my Denver replacement?
Yes — and we recommend discussing it on every Denver replacement. Class 4 shingles (UL 2218 certified) sustain significantly less fiberglass mat fracture from the 1.5–2-inch hailstones that Front Range events regularly produce. Many Colorado insurers offer premium discounts of 10–30% for Class 4 installations. The product cost premium vs. standard architectural shingles is typically offset meaningfully by the insurance discount and by the reduced replacement cycle probability in Denver's hail frequency environment.
Understanding the process before it begins makes a significant project straightforward. If your Denver home needs a roof inspection, a replacement evaluation, or if you're ready to schedule a replacement — Precision Exteriors provides free inspections, honest scope recommendations, and complete Denver roof replacements with a 10-year workmanship warranty and Owens Corning Platinum Protection availability. Colorado License #0248041. Owens Corning Preferred. Denver-permitted.
Free inspections. Full-system replacements. 10-year workmanship warranty.
Schedule a Free Roof Inspection → Call (720) 408-1840 Roof Replacement Denver → Insurance Claims Guidance →
Get a Free Estimate
Call us today or fill out the form below for a free, no obligation estimate and exterior inspection. One of our team members will be in touch soon to learn more about your project and schedule an appointment.